Tuesday, September 7, 2010

Look what I finished!!!

I finally finished my "America" Blocks!

My husband and I went down to thatcher and St. David for the long weekend. While we were down there we picked up my vinyl for my "America" Blocks as well as a whole other project I have already completed for Halloween! I will post it as soon as I can! So Excited!

Here are her blocks...


and here are mine!...


Melissa Elizabeth

Thursday, September 2, 2010

Topiary Craft

These are the bomb! I loved making these! They are sooo simple!!!

Supplies:
  • 2 flower pots (found at micheals)
  • News paper
  • off white ribbon
  • letter or number stencils
  • black and light green paint
  • A bag of moss (cheaper at the dollar store then micheals)
  • Small wooden rod (found at micheals)
  • A moss ball (Micheals)
  • Hot glue gun
  • Hot glue sticks

1. Paint your flower pots Black

2. When paint is try tape on your stencils and then paint on your letter or number of your desire.
Hint: Tape on your stencil tightly on your pot or else you will have dripping paint like I did and will have to fix it up with a tiny brush and black paint.3. Peel stencil off after you paint or else the paint will get stuck to the stencil and will peel the paint off when you take it off.
4. Hot glue a small piece of green Styrofoam at the bottom of each flower pot. This will keep the wooden rod from moving around.
Hint: Put a piece of cardboard or something solid underneath your flowerpot over the little hole that is at the bottom before putting on your green foam... My rods went straight through the foam and straight through the small hole at the bottom of the pot. Pain in the butt!
5. Next take your moss ball and stick it on your wood rod. Push it hard so it stays. You could make your own moss ball like the blog I stole this idea from suggested, but I got lazy and just bought a moss ball :). It was also easier looking then what she was telling me to do to make a ball.
6. Now put your rod and moss ball into your flower pot and into the green foam.

7. Put news paper in the flower pot all the way to the top.8. Take your handy dandy hot glue gun and put hot glue on a section at a time on the news paper and quickly before it cools put on a bunch of moss in that section.
9. Continue with step 8 until all the news paper is covered in moss.
10. Now take your ribbon and tie it onto your pot. You can hot glue it to your pot once you have it where you want it so it does not fall off.
11. Now put these babies anywhere in your home to make a beautiful accent piece!


These were my very first craft that I tried when looking through craft blogs. These were what kept me going at crafting. They turned out so well that it gave me such a confidence boost in crafting that I continued to find more and more crafts that I could make and be proud of making!

Here is the picture I got the idea from...
And here are mine!...

I did my own little flare here, I did the letters M and J instead of #1 and 2 because they stand for Melissa and Jason. They are currently in our bedroom and are on each of our sides of the dresser. J on his side and M on mine!I even have the & sign! I love that thing! If you want one go to micheals they usually have them. I got mine for $3

The best part about these trees is that you can move them any where in the house and they make that space look spectacular! Even in your bathroom! I had them on my fireplace, my piano, and currently on my dresser and they look great! Tell me what you think and if you are willing to make these!

Good Luck!
Melissa Elizabeth


Wednesday, September 1, 2010

Wooden American Flag!

I know that there were a handful of you out there who had come to my house and had seen my wooden American flag out on my front porch and had all asked me exactly how I made it. Well here are all the instructions you need to make one of your own! Sorry it took so long :)

This project was so simple and fun I would do it 100 times over! This is my wooden American flag that I made for my front porch for the 4th!

I got this idea from a blog that was on my friends blog... make sense?

SUPPLIES:
  • Old wood pallet
  • red, white and blue paint
  • A hammer
  • Pencil
  • Star stencils
  • Sander
  • Wood stain
  • Old rag or towel

1. I took an old wood pallet you find in construction sights or in my case in my parents neighborhood on bulk trash day, and I tore it apart (helps to use a hammer to get the nails up) and put 4 of the 5 wood panels together flat on the floor.
Hint: I kept most of the nails in the boards and just hammered them flat on the other side. The nail heads gave the flag a more old rustic look.
2. I took my palm sander and sanded down all the wood pallets to make them smooth (this makes it easier to paint)

3. I then drew with pencil the square where the blue of the flag along with the stars would belong, (Just so I wouldn't paint that section red or white along with the stripes).

4. I then drew a line down the middle of each pallet to show me where my stripes would be.

5. I painted in my stripes. One half red the other half white. Once that dried I did a few more coats just in case.
6. I then painted the section I traced out blue.

7. I cut out the size of my stars I wanted on my cricut. Hint: if you don't have a cricut just print off a picture of a star from your computer and trace around that or go buy a stencil!!


I then traced the stars on the wood where I wanted them to go.

Yes the above photo has white already painted but I was showing you my traced star.

8. I carefully painted the stars white. I would strongly suggest using a small brush to paint the white on the stars... I didn't have a brush and was forced to use my finger! It worked but it was messy! Its a good thing I still like finger painting lol
9. Once the paint had all dried I sanded down the corners and the sides. (you sand the sides and the corners so that when you stain them they become darker and help with the whole Antique look)
10. I then took wood stain and wiped it on the flag to give it an antique look to it. I took a big foam brush and dipped it lightly into a walnut wood stain then brushed it on the corners and sides of my flag.


Hint: QUICKLY wipe off the stain with a close nit piece of fabric... the longer the stain is on the wood, the darker the stain stays. You just want an antique look not a burnt look.
I loved how it turned out and love how simple it was to make! I made it in one day. I put it on my front porch where it sat very well.

Here is the picture of the flag I got the idea from...


and here is mine!.....


Have fun and Good Luck!
Melissa Elizabeth

Sunday, August 29, 2010

"America" Blocks

Ok so this project slightly got left behind... I had everything done except I was missing one very important part of this project... the vinyl lettering. The girl that this idea came from is my husbands friend. I found her blog one day when I was on my husbands facebook and she commented on one of our pictures. I found her facebook and saw that she had a craft blog and I found that she had made these beauties! I wanted to make them right away. I contacted her on facebook (yes she had no idea who I was at first) lol and asked her if she could help me make these. She told me step by step! She told me she would send me the vinyl pre-cut and everything... Well I forgot to send you $5 for the vinyl and she forgot to send it. :( but it's ok! I don't mind at all! I am going to thatcher this weekend and while I am down there I will pick it up from her along with another fun craft and finish these amazing blocks and when I do you betcha bottom dollar I will be posting it on here.
Thanks Amanda for all your help you rock my socks!


This is hers...


This is mine so far...
Here is what it will look like! I got creative here and put the letters on by using my photography editing program. Its looks legit right? :)

Here is Amanda's craft blog if you would like to see what other fun creative ideas she has done!
P.S. I love her blog the most out of any other Craft blog! I am constantly on it looking at what other amazing things she has done! http://dejavucrafts.blogspot.com/


If you want to still know how to make the blocks here it is:

You will need
  • 1 thin ceder wood board found at home depot (ask for a wood fence board. It is like $1.85 for a 6ft by 5 1/2 inch board)
  • red white and blue craft paint
  • sand paper
  • vinyl
1. Cut that board into 7 blocks (if you ask someone at home depot they will do it for you)
Three big blocks measuring at: 7" each
Two Medium measuring at: 5 1/2" each
Two small measuring at: 4 1/2" each

2. Sand down your blocks to make smooth.
3. Paint on desired color onto each block.
4. Let paint dry then sand blocks again as well as edges and corners for a rough look.
5. Cut out vinyl if you don't have some pre-cut already.
6. Put vinyl on!

Sorry not a lot of pictures for this one. lol

I hope to put my finished product up soon so you can all see how my blocks turned out. But for now Good Luck if you are going to make these!

With Love
Melissa Elizabeth

Saturday, August 28, 2010

Paper Firework Weath!

Once again I just LOVE doing crafts, always have, however once you have a baby everything kinda goes to the way side until you can get back around to it.
Here is one thing I made just for the 4th of July!

This is my favorite thing I made for the 4th of July. I call it the Paper Firework Wreath
It is a scrapbook paper wreath that I made all by hand! I absolutely love how it turned out HOWEVER I would NEVER wish this project upon anyone! It took me over 2 months to finally get it completely finished, not to mention that there is a certain design of scrapbook paper that is essential for this project that does not exist in any scrapbook stores in the state of Arizona! Believe me I've checked! The paper pattern is as simple as pie so you would think that someone would have it... but no. It is dark blue paper with white stripes on it.... sound simple enough? Well apparently not to anyone in the scrapbook paper industry! I ended up just buying 2 plain dark blue pieces of paper and painting white stripes on the dang things. That alone took me a few hours to do!I found out that hot glue was my best friend during this whole project! The magazine I got the idea from said to use a glue stick to glue the pieces of paper together... I started with a glue stick but big surprise everything fell apart so I was forced to bust out the good ol' hot glue gun! Good thing I did too because it not only kept the pieces of paper together better but it also dried quicker then 25 minutes each time I used it! hallelujah!

Here are the steps you do for each individual paper firework and on to completing the wreath..

YOU WILL NEED:

  • ALOT of scrapbook paper (red, white and blue) with different patterns
  • Hot glue gun
  • Hot glue sticks
  • 18in Hay wreath (Found at Hobby Lobby)
  • 8 to 12 yards of 1 1/2" red white and blue ribbon
  • 12 small blue bells (found at Micheals in a variety pack of colored bells)
  • small chalkboard (found at Micheals)
  • Scissors/slide cutter
  • Metal ruler so you can measure and make a crisp crease.
  • Star stickers both for the wreath and the chalkboard
  • PATIENCE!

1. Cut out paper to desirable sizes
Big firework (4" x 6" )
Medium firework (3" x 6" )
Small Firework (2 1/2" x 3 1/4" )
All the smallest fireworks I honestly cant tell you what measurements they are because I just guessed. :/ The magazine didn't tell me either so I just winged it by just taking the small firework measurements and cutting them in half or into thirds or smaller. Sorry not much help there but it is fun to have a challenge!
I used a slide cutter to cut everything.... I would strongly suggest this for you because it saves you another few hours of work!
Once you have cut out your paper:
2. Take three or 4 of the same size and preferably same pattern of paper (depends on how full you want the firework) and start folding the paper width-wise accordion style. Be sure not to make the accordions too large, fold them to be just about a 3/8" all the way till it is fully folded.

Take you metal ruler and use it to fold over you paper this helps you create a very straight line. I didn't do this step at first and my lines were screwy Lewie!
Slide your metal ruler across each crease to make it more crisp. This will make your accordions flatter and easier to handle! This will make your wreath more sharp looking as well!


3. Next fold the pleaded paper in half and HOT GLUE the two sides together making a small paper fan.


4. Repeat steps 2 and 3 with the other two or three pieces of matching paper.

5. Once you finished steps 2-4 then glue all the sides together of the three or 4 (now Fans) of paper to make a circle!

Congratulations! you made Firework number 1 out of about 50!

6. Make about 45 to 50 fireworks of all different sizes, colors and patterns. (This is about the time you will want to kill yourself..... but please don't)

7. Once you have spent days maybe even weeks making the fireworks it is time to prepare the wreath for the fireworks.
Take your 18 inch wreath (I used a hay wreath, it was cheaper and easier to find then the green foam one my magazine asked for! I got my wreath from hobby lobby). Once you have your wreath take your 1 1/2" inch ribbon and wrap it all the way around your wreath to cover it completely. Warning! you will need at least 8-12 yards of ribbon if not more (yet another thing I had to figure out the hard way by myself)
Hint: Hot Glue your ribbon onto your wreath, otherwise it will unravel and piss you right off!.... not that I would know or anything.... *cough cough* :p
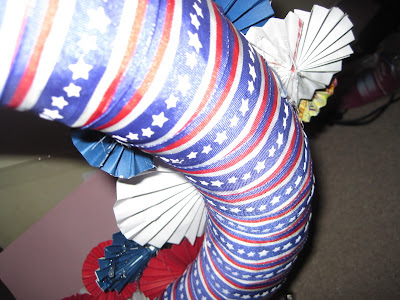
p.s. I know that these pictures are pictures with the fireworks on it but that is because I forgot to take a picture of this step when I was in the middle of the project so now I am just showing you how it should look once the ribbon is on the wreath :)
8. Now that your wreath is all wrapped in ribbon start Hot gluing on fireworks randomly! I started with big fireworks on the bottom (the actual wreath) then worked all the smaller sizes in.
9. Once all the fireworks are on the wreath start sticking the assorted star stickers on some of the fireworks. Put them in the middle of the fireworks.
10. Start putting on your blue bells randomly on the wreath. You could also put on red and silver bells like I did to give it more of a sparkle. The magazine told me to use small blue Christmas ornaments, but those are nowhere to be found in the middle of the summer so I had to once again improvise. The bells in my opinion are better because they make the wreath all jingly!
11. I bought a cheap little chalkboard from Micheals and painted the sides white and put on all the red, white and blue star stickers I could collect! I then stuck the wreath on a wreath holder on the door and then put Velcro on the door and the chalkboard and stuck it together to hang.

This was the picture I took the idea from...
THEIRS!!!!!!
... and here was my version..
MINE!!!!!!!
I even had the blue door to match with! SWEET!
And no you do not have to paint your door blue. Please don't this wreath looks good on any color door. ;)

I hope you found the instructions to this project simple to follow because the project itself is nowhere near simple. But once again be warned when you are about to throw your wreath against the wall because it is taking FOREVER to finish just know that I did in fact warn you!

P.S. If you don't want to do this wreath for the 4th of July you could also do spring, fall or Christmas colors! I think Halloween colors would look wicked with this design! Of course Halloween is soo my favorite to decorate for, well that and Christmas. :)
Have fun and good luck! haha

I promise my other Crafts I have made are easier! This one was the toughest but SO worth it!!

With Love
Melissa Elizabeth