Wednesday, May 4, 2011

Spring Wreath!

This was a clever idea I found while Blog surfing so of course I decided to copy it for my own house! My poor husband thinks I have gone mad with all these wreaths I have done lately! Oh well! haha!

So here is what you need to do!
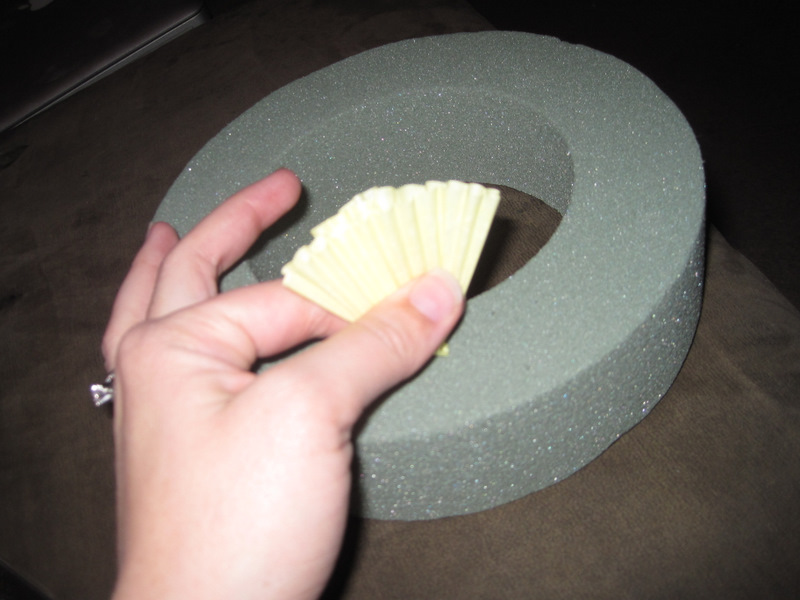
Supplies:
  • Foam wreath any size (got mine at the dollar store)
  • Cupcake holders (Walmart for the plain ones and Micheal's for the checkered cute ones!)
  • Hot glue gun
  • Hot glue sticks
  • ribbon (optional)
  • band-aids.... just in case (not kidding I burned myself a few times while doing this)
1. I didn't do step one but if you want to, wrap a cute spring pattern ribbon around your foam wreath. (I was totally lazy and didn't ha!)

2. Fire up your glue gun and start crumbling your cupcake holders.
3. Glue on at random the cupcake holders in what ever order you want them in. I just randomly put on all the spring colors making sure I didn't have too many greens together in the same bunch or blue etc...
4. Once all done make sure there are no holes or empty spots, if so just fill them in with another cupcake holder or two! then you are all done!

See simple and easy and WAY cute for your spring holidays or just for a nice light spring decoration.

Here is theirs...
(I wanted more color in mine where this girl liked the more vintage look with little color (which is still WAY cute!)

And here is mine! (The colors matched my decor better) Mine is also smaller... but still way cute!

Have fun Crafting!
Melissa E.

Tuesday, March 29, 2011

McDonalds Fruit Parfait Copy-cat

So I am pregnant (again) and I am constantly craving healthy things (and Mexican food but that doesn't count) and there is just one thing I love at McDonald's (considering that place is death!) and that is their fruit and yogurt parfaits! YUM! Well since I was tired of getting my cute husband to go fetch me a yummy fruit parfait I decided I would make them myself! I went to my local farmers market (AMAZING!) and got some fresh CHEAP fruit and then went to Wally world (Wal-mart) and got some vanilla yogurt. Here is what I did to make this spectacular treat!

Supplies:
  • Strawberries
  • Blueberries
  • Boysenberries
  • Vanilla Yogurt
  • Honey Bunches of Oats cereal (its a must!)

1. Wash off all of your fresh fruit (duh).

2. Slice them all up the size that you desire.

3. Get a cup and fill the bottom of it half way with vanilla yogurt.

4. Dump in the fresh fruit.

5. Put more vanilla yogurt on top of your fruit.

6. Top off with a handful of Honey Bunches of Oats cereal to add the crunch factor!

YUMMY!!!! These are sooo good! My husband even liked them and he is a hard costumer when it comes to healthy eating (don't tell him I said that lol). I will admit to all of you that these homemade parfaits are 10000x's better then the McDonald's ones! I think because McDonald's only has strawberries and blueberries that are frozen half the time (I hate frozen fruit! yuck!) and mine are fresh!!!

I hope you enjoy this tasty and HEALTHY treat!

Have Fun!
Melissa Elizabeth

Monday, February 14, 2011

The ADORABLE Feather Boa Wreath!!

This looks SOOO cute on my door!! Not to mention it is the easiest craft I think I have ever done! Perfect for Valentines Day!

Supplies:
  • Pink feathered boa (From either Hobby Lobby or Joann's both same price but be sure to have a coupon because they are $7.99 each)
  • Cardboard (or if you were desperate like I was a pizza box will do just fine!)
  • Hot glue gun
  • Hot glue sticks
  • Sharp scissors
1. Draw a big heart on your cardboard/pizza box

2. Cut out your heart (Not your real one.... men can do that for you lol)

3. Cut the inside of your heart out so you have a nice outline

4. Fire up your hot glue gun and put massive amounts of hot glue on your heart.

5. Put the feather boa all around your heart and press down so that the glue and the feathers adhere to each other.

6. Put it on a wreath holder or glue some ribbon to the back and you are good to go!!

These were super cute so I decided to make two! Once with multiple shades of Pink and the other just a plain Hot pink that I stuck on my fireplace and put a Valentine plaque in the middle that I got from the Dollar store!

Here was my inspiration.... Theirs


MINE!!!


Have a Happy Valentines Day!!!!
Have fun!
Melissa Elizabeth

Monday, February 7, 2011

YIKES!!

WOW! I have not been on my wonderful Craft blog in AGES and I am having major withdrawals from crafting! It has been hectic here... life has hit me right between the eyes and I have had zero time for my crafting life but have no fear I am back and am ready to show you what I have up my sleeve for VALENTINES DAY!!! Its a bit late in the game but hey better late then never! I am working (finally!) on a few projects that are fun and SIMPLE!! You can have them done within minutes! SO excited to give you my tutorials! My next post will be rockin! I PROMISE!
Give me time to finish the crafts then I will post them on here as quick as I can so you can make your house decked out for V-Day!

Thanks for your understanding and again so sorry I have not posted in forever! I know there are some of you out there that are religious readers and I have totally let you down BUT DON'T WORRY!!! You will love this blog again!

With love
Melissa Elizabeth

Monday, December 13, 2010

$5 Christmas Wreath!

This was so fun for me to make! This is my very first Christmas wreath that I made all by myself! The idea came to me while I was walking the Christmas isle in the Dollar store and saw all materials I needed. A light bulb turned on in my head and I was off!

Supplies:
  • Dollar store Wreath
  • Dollar store Christmas flowers (Your choice have fun with it)
  • Dollar store spray on snow
  • Dollar store golden bells
(Don't mind the pin cones I got those just in case I wanted them somewhere on my wreath... I ended up not using them for the wreath but for something else)
1. First I took the wreath and put the golden bells on at the base. You can put these anywhere you want I just decided to put them on the bottom.

2. Take your spray on snow (I know there is a proper name for it but I have seemed to forgotten it) Spray the tips of the branches of the wreath. (LET DRY BEFORE PUTTING FLOWERS ON)


3. Take apart your Dollar store flower bundles and pick out all the flowers you want to put on the wreath.

4. Leave a long stem on the flowers that you want so that you can wrap that wire around the wreath to keep the flowers in place.

5. Randomly put the flowers on the wreath the way you want them to go. Wrap the wire that is on your flower tightly around the skeleton of the wreath so you don't see the wire and that it holds the flowers on well.


Spruce up the wreath a bit so it is not all flat and hang on your door you are done! TA DA! Easy peasy!
(These pictures don't really do my wreath justice, in real life they are 10x more sparkly and colorful!!)

Have Fun!
Melissa Elizabeth

Thursday, December 2, 2010

Christmas Candle Stick

I found this treasure at Goodwill one night when I decided to spoil myself and buy just a few things! It is a candle stick that was screaming at me to refinish it!

I knew what I was going to do with it so I got started right away!

Supplies:


  • old candle stick with intricate designs on it
  • White Paint
  • 2 foam paint brushes
  • A can of wood stain
  • Sand paper
  • Paper towels
1. Paint the candle stick all white (You will need to do a few coats to get a solid color).

2. Once paint is dry take sandpaper and sand all the edges and anywhere else you want the stain to make darker.

3. Stain the candle stick small portions at a time and quickly wipe off with a paper towel.
Hint: The longer you leave your stain on the paint, the darker the stain will make the paint.


4. Let the stain dry completely then put your candle on it and put it in your Christmas decor! (my decor is only half up so I don't have a good picture of the new candle stick used in a cute way. But when I do I will be sure to post one!)


Enjoy!
P.S. The best part is rummaging around at goodwill to find a candle stick if you don't have one already!

Before!!!!


After!!!!


Have fun!
Melissa Elizabeth

Monday, November 8, 2010

Homemade Root Beer


What a fun and tasty craft! I was throwing a Halloween party for all my married friends and decided to make my own Halloween root beer to share! I made it in a black cauldron and everything! It was very spooky.
This was exciting to make, not only was it my first time making it but you get to use Dry Ice!! I LOVE that stuff!!


Supplies:


  • Big bowl

  • Water

  • Sugar

  • Root beer extract

  • Spoon

  • Dry Ice

1. Poor the water and sugar into the bowl or cauldron and mix together until sugar is completely dissolved.


2. Poor in the root beer extract and mix well

3. Put a chunk of dry ice in the bowl and put a cap LOOSELY on the top of it. The dry ice will create carbonation. Do not seal completely or else it will explode!

4. Wait a few minutes before you serve, that way you can get more carbonation.

This is a fun thing to add to your Halloween parties in the future! The dried ice fog flows out of your bowl and all over your table giving your party an extra twist on fun! Not to mention the dry ice makes an eerie bubbling sound that you would hear in a witches brew! Very spooky and quite tasty for you and your friends!


P.S. You can make this for any party not only for Halloween! There is a entire separate recipe on the back of the root beer package you can follow that does not include dry ice.

Have fun!

Melissa Elizabeth