Monday, December 13, 2010

$5 Christmas Wreath!

This was so fun for me to make! This is my very first Christmas wreath that I made all by myself! The idea came to me while I was walking the Christmas isle in the Dollar store and saw all materials I needed. A light bulb turned on in my head and I was off!

Supplies:
  • Dollar store Wreath
  • Dollar store Christmas flowers (Your choice have fun with it)
  • Dollar store spray on snow
  • Dollar store golden bells
(Don't mind the pin cones I got those just in case I wanted them somewhere on my wreath... I ended up not using them for the wreath but for something else)
1. First I took the wreath and put the golden bells on at the base. You can put these anywhere you want I just decided to put them on the bottom.

2. Take your spray on snow (I know there is a proper name for it but I have seemed to forgotten it) Spray the tips of the branches of the wreath. (LET DRY BEFORE PUTTING FLOWERS ON)


3. Take apart your Dollar store flower bundles and pick out all the flowers you want to put on the wreath.

4. Leave a long stem on the flowers that you want so that you can wrap that wire around the wreath to keep the flowers in place.

5. Randomly put the flowers on the wreath the way you want them to go. Wrap the wire that is on your flower tightly around the skeleton of the wreath so you don't see the wire and that it holds the flowers on well.


Spruce up the wreath a bit so it is not all flat and hang on your door you are done! TA DA! Easy peasy!
(These pictures don't really do my wreath justice, in real life they are 10x more sparkly and colorful!!)

Have Fun!
Melissa Elizabeth

Thursday, December 2, 2010

Christmas Candle Stick

I found this treasure at Goodwill one night when I decided to spoil myself and buy just a few things! It is a candle stick that was screaming at me to refinish it!

I knew what I was going to do with it so I got started right away!

Supplies:


  • old candle stick with intricate designs on it
  • White Paint
  • 2 foam paint brushes
  • A can of wood stain
  • Sand paper
  • Paper towels
1. Paint the candle stick all white (You will need to do a few coats to get a solid color).

2. Once paint is dry take sandpaper and sand all the edges and anywhere else you want the stain to make darker.

3. Stain the candle stick small portions at a time and quickly wipe off with a paper towel.
Hint: The longer you leave your stain on the paint, the darker the stain will make the paint.


4. Let the stain dry completely then put your candle on it and put it in your Christmas decor! (my decor is only half up so I don't have a good picture of the new candle stick used in a cute way. But when I do I will be sure to post one!)


Enjoy!
P.S. The best part is rummaging around at goodwill to find a candle stick if you don't have one already!

Before!!!!


After!!!!


Have fun!
Melissa Elizabeth

Monday, November 8, 2010

Homemade Root Beer


What a fun and tasty craft! I was throwing a Halloween party for all my married friends and decided to make my own Halloween root beer to share! I made it in a black cauldron and everything! It was very spooky.
This was exciting to make, not only was it my first time making it but you get to use Dry Ice!! I LOVE that stuff!!


Supplies:


  • Big bowl

  • Water

  • Sugar

  • Root beer extract

  • Spoon

  • Dry Ice

1. Poor the water and sugar into the bowl or cauldron and mix together until sugar is completely dissolved.


2. Poor in the root beer extract and mix well

3. Put a chunk of dry ice in the bowl and put a cap LOOSELY on the top of it. The dry ice will create carbonation. Do not seal completely or else it will explode!

4. Wait a few minutes before you serve, that way you can get more carbonation.

This is a fun thing to add to your Halloween parties in the future! The dried ice fog flows out of your bowl and all over your table giving your party an extra twist on fun! Not to mention the dry ice makes an eerie bubbling sound that you would hear in a witches brew! Very spooky and quite tasty for you and your friends!


P.S. You can make this for any party not only for Halloween! There is a entire separate recipe on the back of the root beer package you can follow that does not include dry ice.

Have fun!

Melissa Elizabeth

Tuesday, November 2, 2010

Melting Candles...

I needed some candles for a huge Halloween project I am still making... I know its after Halloween but this particular craft has been pushed over 1 to many times and I had to start from scratch every time..... otherwise I would be done with it. Well with this mystery craft I needed some candles.. I was going to go buy some until I found that I could make some that were 100 times more spooky looking then the original store bought ones! I was all over it if I could make my own candles!


Supplies:


  • Hot Glue gun

  • A TON of hot glue sticks

  • Toliet paper rolls

  • News paper or grocery bags

  • A few electric T-lights

  • Off-white paint

  • Paint brush
1. Rip the top off of each toliet paper roll. Make sure they are uneven.

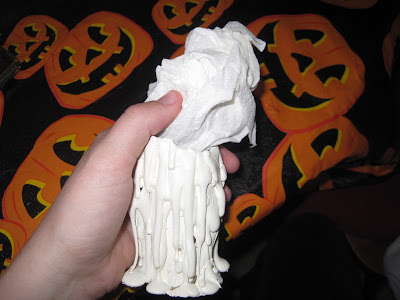
2. Cover toliet paper roll with driping hot glue.... do one coat of glue all over the roll then wait until it is dry and do another layer.... do a few layers this will give the candle a more aged look to it.


3. Once the glue is all dry and layerd how you want it to, paint the entire thing off white.

4. Wait till all the paint is dry then stuff the roll with news paper or a grocery bag.

5. Put the T-light in the top of the TP roll and turn it on for the full affect!

You can put these candles anywhere in your home for a more hunted, aged look to your Halloween decor!

Theirs...

Mine!

Have Fun!

Melissa Elizabeth

Cake Pops!

I found this recipe on a blog and knew I needed to make these! SO GLAD I DID!!! These little things are Blasted with AMAZINGNESS! SOOO incredibly yummy! Here is what you do:

Supplies:
  • 1 double fudge chocolate cake mix
  • 1 can chocolate icing
  • 2 Big Mixing bowls
  • A package of melts White Chocolate
  • Crisco
  • (Optional) Sucker Sticks found at Micheal's
1. Mix up your cake mix into a big bowl

2. Poor into a greased 13x9 casserole dish and back recommended time on back of cake box

3. Take cake out once all baked let it cool.

4. Crumble the cake into a clean big mixing bowl

5. Add 1/2 of the can of chocolate icing into mixing bowl

6. This part is messy use your hands to combine crumbled cake and icing until it is all mixed well and moist!

7. Roll the cake mixture into small balls and place on a plate or thing of tin foil

8. While rolling the cake balls have someone melt the white chocolate either in the microwave (instructions on back of each white chocolate bag) Or make your life 10 times easier and melt your chocolate in your handy dandy chocolate melting pot found in the Wilton section of walmart or Micheal's while you make the balls. Stir often.

9. Once the white chocolate is completely melted add a large spoon full of Crisco and mix well. This make dipping the cake in the white chocolate a lot easier.

There are two ways of doing these cake pops from here. You can either make them with or without sucker sticks. I have had zero luck with the sucker sticks keeping the cake pops up like a sucker mine have always fallen off, so I make mine without the sticks but here are both ways of doing it.

10. Either Dip each cake ball into the white chocolate...cover well then take out and put onto serving plate. Do this to each cake ball until all finished. (Quicker way to eating theses things!)
OR take one sucker stick at a time dip one end into the melted chocolate
  • then put into each cake ball and wait until they harden
  • take the entire stick with cake ball attached and hold over melted chocolate and cover while using a spoon.

11. You can start eating the cake balls while the white chocolate is still soft but in my own personal opinion they taste a BUNCH better if you leave them to harden for a few minutes in the fridge or just on your counter!
They are supposed to be facing upward like a real sucker but mine always fall of the sticks... I don't think I let them harden enough before I put the chocolate on... im not patient! I want to eat them as fast as I can! lol
You can decorate these however you want! Have fun with them! Everyone will love them! They are that good!

Theirs....
Yeah I know... These look extremely better then mine but like I said I failed at the whole sucker affect... haha but they all taste the same! Promise!!

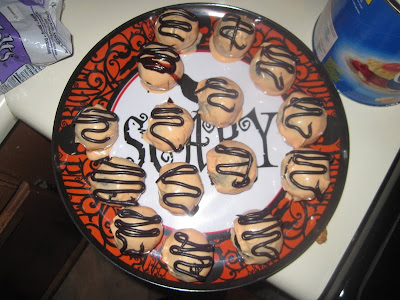
Mine! (I was trying to make them halloween colors... haha fail!)

Have fun!
Melissa Elizabeth

Beware Broom

I just pieced this together with things around my house. I had bought this small witch broom at goodwill a few weeks back and wanted to use it for something but forgot about it. It all was light tan when I bought it, knowing I would paint it later. The beware sign I got for 25c at a garage sale a month back. I found theses things around my house and used them together to make this fun broom!

Supplies:

  • Black spray paint
  • Small broom
  • Orange ribbon
  • Black ribbon
  • Foam sign
  • Sewing pins
1.Spray paint your witch broom handle black

2. Slightly spray your grass of your broom with black to make it look more aged and burnt.

3. Tie an orange ribbon at the base of your broom in a bow

4. Pin a black ribbon to the back of our foam sign with two sewing pins

5. Hang sign on broom

Simple and cute! You will just love this in your house!

Here is the finished product!


Have Fun!
Melissa Elizabeth

Wednesday, October 20, 2010

DIY Chalkboard Door!

Ok so the story behind this beauty is, I walked into my parents house and saw that my mom was painting a door we have leading out to our garage black as night....this didn't make sense to me at all... why black? I asked her what she was doing and she showed me the can of paint she was painting with. It said Chalkboard Paint! I thought that was the most clever idea since she has a bunch of kids still at home who love to color on walls, so naturally.... I copied her! She had extra paint in the can so I brought it home and her and I painted my pantry door that is in my kitchen. It was always an awkward shaped door and had no purpose to be there SO we made it into my Chalkboard door! I love it! I have used it so much, anywhere from me writing up the menu for dinner when we are having friends over, writing up my To Do lists, Doctor appointments, to... when my crazy neighbors would randomly come into my house and the kids needed something to do with their hands and were feeling creative so they would scribble at remarkable speeds on my door!! This is the most rewarding craft because you don't need it particularly for a holiday or season... when you are done with it you don't have to put it into a box for a year until the next go around, it is always there and is always useful!

Supplies:
  • 1 can of KRYLON Chalkboard indoor paint... Flat Black (it is a yellow can)
  • Sand paper
  • Paint roller
  • Chalk and Eraser
1. Wash your chosen door so you don't have any dust or sticky stuff getting in the way of the paint.

2. Sand down your door with sand paper, especially if your door is like mine and had heavy wood grains. Don't sand too much just enough to make your surface smooth but rough enough to hold paint.

3. Wipe off the door once more to get the dust you just made from sanding.

4. Paint first layer of paint then let dry for 48 hours...

5. Paint second coat and let dry for another 48 hours...

6. Once paint is completely dry take a piece of chalk and rub it all over the entire painted surface of your door. Make sure you get the whole surface (this helps the chalk to stick on the chalkboard when you begin to write on it.)

7. Take your eraser and erase all your chalk... now you can begin to use your chalkboard door!

If you have any questions... read the back of your can.... They say wait 24 hours but I found best results after 48 hours of drying...
If you do not have a wooden door... or a door at all to paint have no fear this stuff can be painted on, metal, Drywall, Plastic, Glass, and paperboard! Here are a few more creative ideas that you could use this stuff on! Walls and tabletops, easels, cabinets, toy boxes, refrigerators, or even to resurface an old chalkboard! (Got these off the back of the can!)

I have so much fun with this chalkboard door! It always come in handy...not to mention it matches the color scheme in my kitchen! Bonus!

Sorry I don't have any pictures of the whole process but I did this project over a year ago... before I even had my fun Craft blog!


TA DA!!!! Here is my beautiful Chalkboard door!!
Hope you have fun with this one! Your kids and Husband will have fun with it for years to come!!!

Have Fun!
Melissa

Monday, October 18, 2010

Cheesecloth MUMMY!

This was a project I thought of on my own... aren't you proud! lol My husband took me to Micheals one Saturday morning...which is a dangerous thing to do! And as I was rummaging around in the clearance isle I found this white craft doll. This particular doll is for dressing up with girls clothes and hot gluing yarn on it head for hair making it into a real doll.... well.... I had a slight different approach on it! I decided to make it into a Mummy! I bought it and got started on it right away!

Supplies!


  • White dress up doll (found at micheals)
  • Cheesecloth (found at Walmart)
  • Scissors (found in your junk drawer)
  • Hot glue gun and hot glue sticks (found at walmart)

1. Cut your cheesecloth into long strips... you will need a few to cover the whole doll.

2 Take the Vodo looking dress up doll and start wrapping it up in cheesecloth.

3. Hot glue the two end points of each strip of cheesecloth to the doll just to keep it from unraveling.

4. Wrap up the mummy until you get the look that you like!

A simple and fun craft! You will have so much fun making it! The best part is... is that it is such a cute mummy to decorate with! Even my husband who has zero decorating/crafting skills thinks so!!!

Mine!!!

Have Fun!
Melissa Elizabeth