Sunday, September 26, 2010

SpOoKy Blocks!

One word... EASY!!!..... Or Spooky however you look at it HA!

**Unsteady hands are more then welcome in this craft.... Imperfection is strongly accepted when doing Halloween crafts, makes the crafts that much more Creepy!

You will have so much fun making these because you get to finger paint!! No vinyl needed HURRAY!! Ok here is what you do~

Supplies
  • 6 blocks (I just guessed the sizes)
  • Orange and Black Paint
  • Sandpaper
  • Elmer's Glue
  • Fingers!!
1. Sand down all your blocks so they are smooth.

2. Paint your blocks Orange on both sides. Do a couple of coats.

3. Take one block at a time and on one side only put Elmer's glue all over that side. Smooth it a bit with your finger and then quickly brush on black paint with a big foam brush. Brush only ONE WAY. Cover the entire side with black paint and leave to dry... In time you will see the paint start crackling! The orange will submerge after the glue and paint have dried completely.. DON'T TOUCH UNTIL DRY!

4. Do step 2 to all of your blocks! Then once they are all dry take your white paint and finger paint on your SpOoKy lettering! *Unsteady hands are encouraged in this craft for this particular step!

5. After the black side is done flip over and sand the sides and corners of each block

6. paint on a wood stain if you desire to your orange side.

7. Wipe off stain quickly!

8. Once stain is dry and not sticky now trace with pencil your lettering on each block just so you have an idea where you want you letters on the blocks.

9. finger paint your black SpOoKy on and let dry!

Done!
Easy huh?

Here are the blocks I stole the idea from Thank you again Amanda at Dejavu Crafts
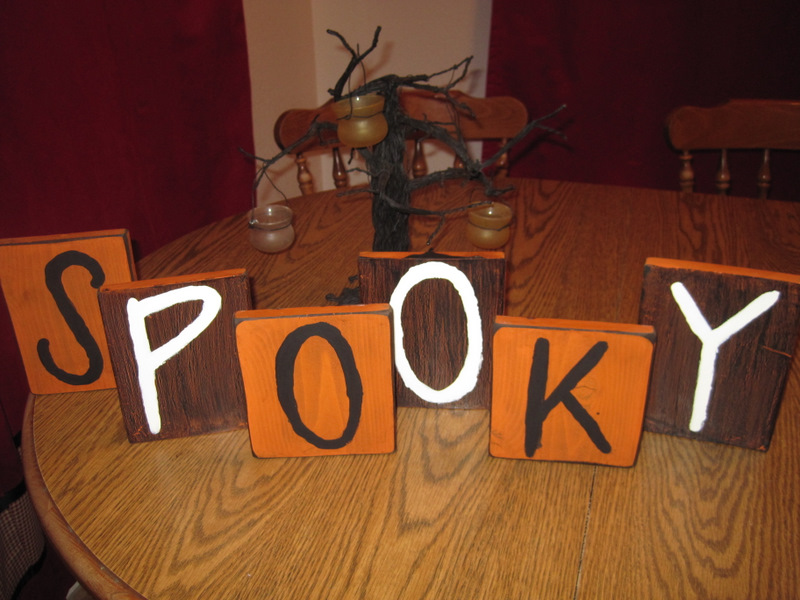
And here are mine!
Mine are a tad different only because I had to guess what sizes the blocks were.... Mine ended up shorter and thinner but they are still just as cute!

I did both sides because that way I can interchange the lettering colors and give it a whole new look! Not to mention I wanted to try the crackle paint for the first time and so I thought this would be a good first run through because if I messed up I could just flip the blocks around and no one would even know! lol Good thing they turned out fine!

Have Fun!
Melissa Elizabeth

Wednesday, September 22, 2010

Candle Eyeballs!

So I got bored today... I needed a small craft to do because I have been working on big crafts for Halloween all week. I rummaged around my house looking for something to transform into something spooky and remembered that my mom had brought me some plain white round candles that she just found on clearance at Walmart. She thought of me and my love of decorating with non-lit candles. I went and got them and decided that they would make perfect floating eyeballs!! Woo hoo! I was off and running.

Supplies:
  • 4 round white candles (apparently found at Walmart)
  • All the colored permanent markers you got
  • Black Permanent marker
  • A round thingy you can trace a circle on the candle with
1. Pick out the color your first eye will be, then take your round thingy (I just found something in my Halloween box that was small enough and round) and trace a circle on your candle with the color you picked.
2. Remove round thingy (I clearly don't really care about technical names!) then draw a big black dot in the middle of the circle you just drew.

3. Color in the colored part of the eye by going up and down from the pupil to the edge of the circle, do that all the way around your eye. This gives it more of an eye-ish look... don't believe me? go look at your eyes!
4. Take another color of marker and scribble it into the colored part of the eye. This gives your eye more of an artistic flair! So if you had your lime green eye use a dark green marker, Blue eye I used purple and green, Orange eye I used red and brown, and brown eye I used darker brown and black.
5. Color in your black pupil again just to make it more round and darker black!

6. Repeat all of these steps but with a different color of eye!

BY THE WAY! I got even more creative and I turned some of the eyes around and I drew in spooky cat eyes on the flip side so I can choose how scary I want my decorations to be. I would suggest doing this as well its way fun!


Have fun!
Melissa Elizabeth

Tuesday, September 21, 2010

"BOO" Blocks!

I absolutely LOVE these! However be very careful when you are explaining to someone what they are... you need to pronounce Boo separate from blocks other wise you will combine the two really quickly and your audience will think you said Boob locks.... yeah had that happen to me more then once! you get a blank stare from your audience then you get the question... "What are boob locks? Is it like a chastity belt in some form?" HA! For some girls who don't know what a real shirt is then yeah I wish! But no... Lol Good times!!
I was on my friends craft blog and she had posted how to make these amazing blocks! I was ready to get started on making them when she tells me that she can put together a kit for me so it makes it easier for me to do. She said that I will have everything right there including the ever so expensive vinyl. I couldn't pass up that offer so I told her I would love to buy one of her kits. My husband and I went down to around where she lives and picked it up! I got started right away!

You will need:

  • 3 semi thick wood blocks (The big one 13 inches, medium 10 inches, Small 7 inches)
  • White paint
  • wood stain
  • sand paper
  • vinyl spelling out "Boo"
  • Rag to wipe off stain
  • 2 foam brushes 1 for the paint and 1 for the stain

1. Paint the blocks white (Do not sand blocks before, the roughness of the blocks give it a more creepy look)

2. Paint another coat of paint on until it is all painted and dried.

3. Take sand paper and roughly sand down the sides and the corners of the blocks. You want it slightly unevenly sanded. Imperfection is highly favored when it come to Halloween projects, makes the craft much more spooky!

4. Brush on a layer of wood stain and wipe it off! The longer the stain is on the darker the wood blocks will be... You decide.
(yes I know I forgot to sand my sides and corners in this picture.. don't do that)
Hint: The places that you sanded will be much darker then where you didn't sand. Don't freak out that is how it is supposed to look!


5. Once the stain is not sticky put on your vinyl lettering and then display!

These were hers:

These were mine!


Have Fun!
Melissa Elizabeth

Sunday, September 12, 2010

Trick of the Trade!

Here is a trick I figured out that I would like to share with you on how to get some unique, amazing decorations for your home!
Ok so a few weeks ago my mom, and I went to Oklahoma to help out at my cousins wedding. (Blog about How I decorated the entire gym by myself using practically nothing coming soon!) While we were there we decided to go rummaging around in all the old antique shops they had to offer (which is alot!) As we were digging through I found so many amazing things that I have since decorated with and love! Here are my treasures!

I love these things! They are as heavy as a rock though! The funny story that comes with these is that the lady posted a sign on them saying "used to be a set of 4" I was sad that I had come too late to get all 4 but I figured that 2 was just fine! I went over to my mom who was looking at some ghastly looking... something... and I showed her! She started laughing and said "Oh my gosh... are you kidding me? I know who has the other 2 to the set!" I couldn't believe it! She then said "the other 2 are in my house and you were the one who used them when you re-decorated my entire house a few months back!!" My jaw hit the floor, I knew exactly what she was talking about. The other two were bought 4 years earlier by my younger sister Heather who I then stole them from and used when decorating my moms house and put them up on her fireplace! I was so shocked! I couldn't stop laughing! What are the chances??? Now that I have a fireplace of my own I am thinking of putting them up on it just because of the whole situation! Crazyness!

Here are pictures of my moms fireplace with the other two block things!
The books I have already put to good use in my home! I put my topiary trees on them! I love how old they look. Not to mention these books has three hidden drawers that open up to put things in! I love them!

As you can tell I had a thing for the scout symbol that day! I just love how they look and are great to use anywhere when decorating!

This is the most sparkly thing I own! Well that and my wedding ring of course lol


If you didn't notice I am in love with all of them but my favorites by far are my necklace and bracelet!!! I wear those practically everyday!

So... if you ever want to have some fun bonding time with your mom, go to some antique shops and dig through the entire store with her and see the same and differences of what you both pick out as "cute". It will surprisingly create so many interesting conversations with her and find things out about her you would have never known before, plus you get some amazing things you can use on a daily basis!

Have fun!
Melissa Elizabeth