Wednesday, October 20, 2010

DIY Chalkboard Door!

Ok so the story behind this beauty is, I walked into my parents house and saw that my mom was painting a door we have leading out to our garage black as night....this didn't make sense to me at all... why black? I asked her what she was doing and she showed me the can of paint she was painting with. It said Chalkboard Paint! I thought that was the most clever idea since she has a bunch of kids still at home who love to color on walls, so naturally.... I copied her! She had extra paint in the can so I brought it home and her and I painted my pantry door that is in my kitchen. It was always an awkward shaped door and had no purpose to be there SO we made it into my Chalkboard door! I love it! I have used it so much, anywhere from me writing up the menu for dinner when we are having friends over, writing up my To Do lists, Doctor appointments, to... when my crazy neighbors would randomly come into my house and the kids needed something to do with their hands and were feeling creative so they would scribble at remarkable speeds on my door!! This is the most rewarding craft because you don't need it particularly for a holiday or season... when you are done with it you don't have to put it into a box for a year until the next go around, it is always there and is always useful!

Supplies:
  • 1 can of KRYLON Chalkboard indoor paint... Flat Black (it is a yellow can)
  • Sand paper
  • Paint roller
  • Chalk and Eraser
1. Wash your chosen door so you don't have any dust or sticky stuff getting in the way of the paint.

2. Sand down your door with sand paper, especially if your door is like mine and had heavy wood grains. Don't sand too much just enough to make your surface smooth but rough enough to hold paint.

3. Wipe off the door once more to get the dust you just made from sanding.

4. Paint first layer of paint then let dry for 48 hours...

5. Paint second coat and let dry for another 48 hours...

6. Once paint is completely dry take a piece of chalk and rub it all over the entire painted surface of your door. Make sure you get the whole surface (this helps the chalk to stick on the chalkboard when you begin to write on it.)

7. Take your eraser and erase all your chalk... now you can begin to use your chalkboard door!

If you have any questions... read the back of your can.... They say wait 24 hours but I found best results after 48 hours of drying...
If you do not have a wooden door... or a door at all to paint have no fear this stuff can be painted on, metal, Drywall, Plastic, Glass, and paperboard! Here are a few more creative ideas that you could use this stuff on! Walls and tabletops, easels, cabinets, toy boxes, refrigerators, or even to resurface an old chalkboard! (Got these off the back of the can!)

I have so much fun with this chalkboard door! It always come in handy...not to mention it matches the color scheme in my kitchen! Bonus!

Sorry I don't have any pictures of the whole process but I did this project over a year ago... before I even had my fun Craft blog!


TA DA!!!! Here is my beautiful Chalkboard door!!
Hope you have fun with this one! Your kids and Husband will have fun with it for years to come!!!

Have Fun!
Melissa

Monday, October 18, 2010

Cheesecloth MUMMY!

This was a project I thought of on my own... aren't you proud! lol My husband took me to Micheals one Saturday morning...which is a dangerous thing to do! And as I was rummaging around in the clearance isle I found this white craft doll. This particular doll is for dressing up with girls clothes and hot gluing yarn on it head for hair making it into a real doll.... well.... I had a slight different approach on it! I decided to make it into a Mummy! I bought it and got started on it right away!

Supplies!


  • White dress up doll (found at micheals)
  • Cheesecloth (found at Walmart)
  • Scissors (found in your junk drawer)
  • Hot glue gun and hot glue sticks (found at walmart)

1. Cut your cheesecloth into long strips... you will need a few to cover the whole doll.

2 Take the Vodo looking dress up doll and start wrapping it up in cheesecloth.

3. Hot glue the two end points of each strip of cheesecloth to the doll just to keep it from unraveling.

4. Wrap up the mummy until you get the look that you like!

A simple and fun craft! You will have so much fun making it! The best part is... is that it is such a cute mummy to decorate with! Even my husband who has zero decorating/crafting skills thinks so!!!

Mine!!!

Have Fun!
Melissa Elizabeth

Monday, October 4, 2010

Halloween Wreaths!!!!

So I made these amazing wreaths through out this week, I started fiddling around while watching General Conference! It took awhile to make them but the end results were so worth it!

I wanted to let you know of a new thing I will be setting up for all of you. I will be selling some of my crafts... selected ones that are done but also kits for some other ones. I wanted to do this for those people out there who don't have the time to craft but have asked if I could make things for them, or for the people who just don't craft at all but wish to have some of my decor... I will start with selling these wreaths! I will have multiple styles to choose from however the three basic ones will be
  • Black
  • Orange
  • Speckled black and orange
  • Jack-o-lantern
I can do what ever style you think of as well as any color combination! Purple, lime green, black, orange etc....
I can add these origami medallions that I have made all by hand to the wreath in whatever pattern you request however each medallion will be 25 cents more (due to how much time they take me!), but you tell me the pattern and color of the medallions you want and I will be happy to make them and provide them on the wreath for you!


I have different sizes of wreaths so if you don't like the small size I have finished you can have a bigger one! The prices are set with no medallions on the wreath again those will be 25 cents each
  • Small $8
  • Medium $15
  • Big $20
The bigger the wreath is the more material I have to use hence the prices!

Please let me know if you would like to buy one of these wreaths, let me know on here or if you have my facebook let me know there what you would like!
I would love to make you what you want!

Thanks!
Melissa Elizabeth

Sunday, September 26, 2010

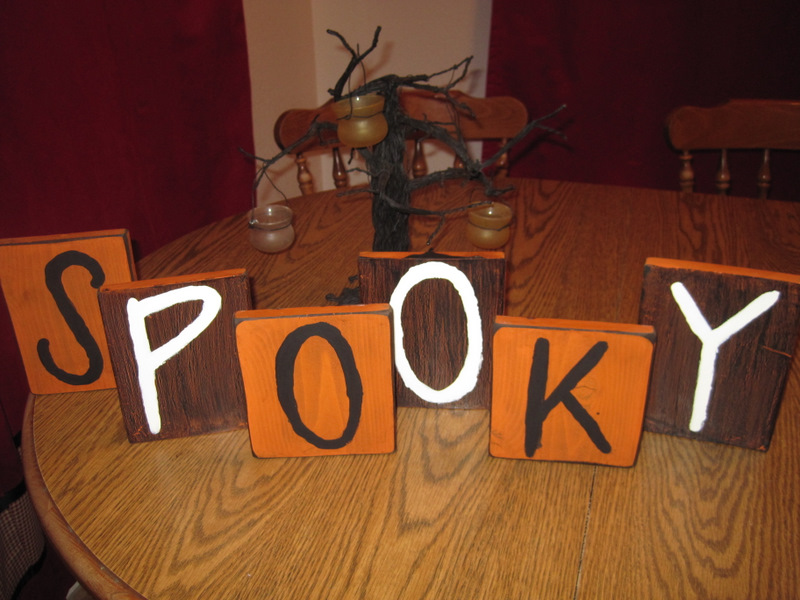
SpOoKy Blocks!

One word... EASY!!!..... Or Spooky however you look at it HA!

**Unsteady hands are more then welcome in this craft.... Imperfection is strongly accepted when doing Halloween crafts, makes the crafts that much more Creepy!

You will have so much fun making these because you get to finger paint!! No vinyl needed HURRAY!! Ok here is what you do~

Supplies
  • 6 blocks (I just guessed the sizes)
  • Orange and Black Paint
  • Sandpaper
  • Elmer's Glue
  • Fingers!!
1. Sand down all your blocks so they are smooth.

2. Paint your blocks Orange on both sides. Do a couple of coats.

3. Take one block at a time and on one side only put Elmer's glue all over that side. Smooth it a bit with your finger and then quickly brush on black paint with a big foam brush. Brush only ONE WAY. Cover the entire side with black paint and leave to dry... In time you will see the paint start crackling! The orange will submerge after the glue and paint have dried completely.. DON'T TOUCH UNTIL DRY!

4. Do step 2 to all of your blocks! Then once they are all dry take your white paint and finger paint on your SpOoKy lettering! *Unsteady hands are encouraged in this craft for this particular step!

5. After the black side is done flip over and sand the sides and corners of each block

6. paint on a wood stain if you desire to your orange side.

7. Wipe off stain quickly!

8. Once stain is dry and not sticky now trace with pencil your lettering on each block just so you have an idea where you want you letters on the blocks.

9. finger paint your black SpOoKy on and let dry!

Done!
Easy huh?

Here are the blocks I stole the idea from Thank you again Amanda at Dejavu Crafts

And here are mine!
Mine are a tad different only because I had to guess what sizes the blocks were.... Mine ended up shorter and thinner but they are still just as cute!

I did both sides because that way I can interchange the lettering colors and give it a whole new look! Not to mention I wanted to try the crackle paint for the first time and so I thought this would be a good first run through because if I messed up I could just flip the blocks around and no one would even know! lol Good thing they turned out fine!

Have Fun!
Melissa Elizabeth

Wednesday, September 22, 2010

Candle Eyeballs!

So I got bored today... I needed a small craft to do because I have been working on big crafts for Halloween all week. I rummaged around my house looking for something to transform into something spooky and remembered that my mom had brought me some plain white round candles that she just found on clearance at Walmart. She thought of me and my love of decorating with non-lit candles. I went and got them and decided that they would make perfect floating eyeballs!! Woo hoo! I was off and running.

Supplies:
  • 4 round white candles (apparently found at Walmart)
  • All the colored permanent markers you got
  • Black Permanent marker
  • A round thingy you can trace a circle on the candle with
1. Pick out the color your first eye will be, then take your round thingy (I just found something in my Halloween box that was small enough and round) and trace a circle on your candle with the color you picked.
2. Remove round thingy (I clearly don't really care about technical names!) then draw a big black dot in the middle of the circle you just drew.

3. Color in the colored part of the eye by going up and down from the pupil to the edge of the circle, do that all the way around your eye. This gives it more of an eye-ish look... don't believe me? go look at your eyes!
4. Take another color of marker and scribble it into the colored part of the eye. This gives your eye more of an artistic flair! So if you had your lime green eye use a dark green marker, Blue eye I used purple and green, Orange eye I used red and brown, and brown eye I used darker brown and black.
5. Color in your black pupil again just to make it more round and darker black!

6. Repeat all of these steps but with a different color of eye!

BY THE WAY! I got even more creative and I turned some of the eyes around and I drew in spooky cat eyes on the flip side so I can choose how scary I want my decorations to be. I would suggest doing this as well its way fun!


Have fun!
Melissa Elizabeth

Tuesday, September 21, 2010

"BOO" Blocks!

I absolutely LOVE these! However be very careful when you are explaining to someone what they are... you need to pronounce Boo separate from blocks other wise you will combine the two really quickly and your audience will think you said Boob locks.... yeah had that happen to me more then once! you get a blank stare from your audience then you get the question... "What are boob locks? Is it like a chastity belt in some form?" HA! For some girls who don't know what a real shirt is then yeah I wish! But no... Lol Good times!!
I was on my friends craft blog and she had posted how to make these amazing blocks! I was ready to get started on making them when she tells me that she can put together a kit for me so it makes it easier for me to do. She said that I will have everything right there including the ever so expensive vinyl. I couldn't pass up that offer so I told her I would love to buy one of her kits. My husband and I went down to around where she lives and picked it up! I got started right away!

You will need:

  • 3 semi thick wood blocks (The big one 13 inches, medium 10 inches, Small 7 inches)
  • White paint
  • wood stain
  • sand paper
  • vinyl spelling out "Boo"
  • Rag to wipe off stain
  • 2 foam brushes 1 for the paint and 1 for the stain

1. Paint the blocks white (Do not sand blocks before, the roughness of the blocks give it a more creepy look)

2. Paint another coat of paint on until it is all painted and dried.

3. Take sand paper and roughly sand down the sides and the corners of the blocks. You want it slightly unevenly sanded. Imperfection is highly favored when it come to Halloween projects, makes the craft much more spooky!

4. Brush on a layer of wood stain and wipe it off! The longer the stain is on the darker the wood blocks will be... You decide.
(yes I know I forgot to sand my sides and corners in this picture.. don't do that)
Hint: The places that you sanded will be much darker then where you didn't sand. Don't freak out that is how it is supposed to look!


5. Once the stain is not sticky put on your vinyl lettering and then display!

These were hers:

These were mine!


Have Fun!
Melissa Elizabeth